
Shout out to Alan who wrote and asked me about hand-baking gluten-free bread.
Here’s what I discovered. Forget everything you knew about bread making. Gluten-free doesn’t need so much kneading (see what I did there) and doesn’t need a second rise.
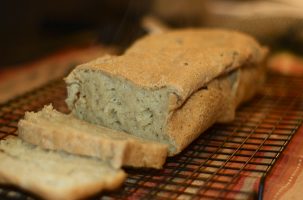
Here’s a great recipe that doesn’t use gluten, dairy or cane sugar and yet still tastes and feels like bread. No crumbling.
Champion Sandwich Bread from glutenfreeandmore.com
MAKES 2 LOAVES
Light in texture, this is the perfect everyday bread for breakfast and sandwiches. This recipe takes only a few minutes to put together in a stand mixer. For maximum yeast rise, have all ingredients at room temperature.
4 cups Brown Rice Flour Blend
1 tablespoon xanthan gum
1 tablespoon gluten-free egg replacer
2 teaspoons salt
½ cup powdered milk or nondairy milk powder substitute
1 package (2¼ teaspoons) active dry yeast
3 large eggs
¼ cup butter, margarine or Spectrum organic shortening
2 teaspoons cider vinegar
⅓ cup honey or agave nectar
2 cups warm water (110 to 115 degrees)
1. Grease and flour two 8-inch bread pans.
2. Mix dry ingredients together in a medium-size bowl. Set aside.
3. Place eggs, butter, vinegar and honey in the mixing bowl of a stand mixer. With the paddle attachment, mix ingredients together for about 30 seconds. The butter (or magarine or shortening) will be chunky.
4. Add half the dry ingredients to the wet mixture. Mix just until blended. Add remaining dry ingredients and mix for approximately 30 seconds, until blended.
5. With the mixer on low speed, slowly add warm water until well absorbed. Turn the mixer to medium-high speed and beat for 4 minutes. Bread dough should resemble cake batter.
6. Spoon the dough into prepared pans. Set aside in a warm place to rise, about 50 to 60 minutes. While dough rises, preheat oven to 375 degrees.
7. Place pans in preheated oven on middle rack and bake for 50 to 60 minutes or until bread’s internal temperature reaches 200 degrees with an instant-read thermometer.
8. Let bread cool in pans for 10 minutes. Then remove loaves from pans and place on a rack to cool.
Each serving contains 119 calories, 3g total fat, 2g saturated fat, 0g trans fat, 29mg cholesterol, 185mg sodium, 21g carbohydrate, 1g fiber, 0g protein.
TIP: Gluten-free egg replacer is available from Ener-G Foods (ener-g.com).
Remember, gluten-free bread dough needs to be mixed vigorously. The best way to do it is with a stand mixer. Don’t have one? The power is out? Do it by hand, and put some elbow grease into it. Don’t worry about over-mixing. There’s no gluten to ‘overwork.’ Crumbly bread will be about moisture content not the vigorous action.

The Squirrel says: Don’t make substitutions until you really know what you’re doing. And don’t omit the gluten alternatives like anthem gum. Don’t use a handheld mixer unless it has a dough hook option. And for some reason, gluten-free recipes often work better using weights rather than volume. (Europeans weigh items, we do it by volume with cups, spoons, etc.) Gluten-free tends to be an exact science so you should look out for variables and take great care to get the chemistry right. Use an oven thermometer because your oven will not be exact. (Try it and see for yourself!) I’ve also read that you shouldn’t double a batch, but instead you should make two batches. If you’re failing, try that.
Still want more? This one is easy!
Brown Rice Flour Blend from glutenfreeandmore.com
MAKES 4 CUPS
1⅓ cups brown rice flour, preferably super-fine grind
1⅓ cups tapioca flour/starch
1⅓ cups cornstarch
1 tablespoon potato flour (not potato starch)
Blend ingredients together. Store in an airtight container in the refrigerator. Allow flour blend to warm to room temperature before using.
Here’s a recipe from King Arthur Flour:
HOW TO MAKE GLUTEN-FREE BREAD: 3 TIPS FOR BREAD MACHINE SUCCESS
If you’ve ever baked bread in a bread machine, then you know it’s easy-peasy. You just put everything into the loaf pan, choose your settings, hit start, and walk away. It’s like a slow cooker, but for bread.
But the real question is… can you make gluten-free bread in your bread machine?
At first, I was skeptical of using a bread machine for gluten-free dough, because gluten-free bread doesn’t use the same rise times as a traditional recipe. But my fears were quickly put to rest when I realized that the Zojirushi Virtuoso bread machine has a gluten-free setting built right in! How great is that!?

Knowing that our gluten-free sandwich bread is always a winner (it never fails me), I put it to the test using a Virtuoso. And let me tell you, with just a couple of minor changes, it didn’t disappoint! The bread was absolutely perfect. It was just the right texture, with a nice crust and a soft interior.
And the best part? All I had to do was put everything into the machine and push a button.
So for those of you who’ve been wondering if a) our gluten-free sandwich bread can be made in a bread machine; and/or b) if gluten-free bread turns out just as delicious when made in a bread machine, the answer is a resounding yes!
After baking my bread, I do have some tips for helping to ensure your bread machine yields that ultimate gluten-free loaf you’re hoping for.

Tip 1: Add a touch more flour.
With our first test of gluten-free sandwich bread in the bread machine using the recipe as written, it lacked the dome that we look for in good sandwich bread. The texture and taste were still there, but the loaf was fairly flat across the top. So we tweaked and tweaked and found that adding just an ounce more gluten-free flour helped us get closer to the dome shape, without compromising the bread’s texture, moistness, or flavor.
Tip 2: Add one more egg.
An extra egg helped give the bread a bit more lift. With the addition of the extra flour, we wanted to make sure the bread didn’t dry out, but adding more milk wouldn’t have helped us with structure or rise. So we added one more egg and found results perfect.
Tip 3: Let the bread cool completely before slicing.
This is so, so important. When the bread first comes out of the pan it will feel a little soft and under-baked. Have no fear; once you let it cool completely, the crust will harden and the inside will be soft and filled with perfect little air pockets. So good!
And now it’s time to bake! Here’s are some quick step-by-step instructions on how to make gluten-free bread in your bread machine.

Step 1: Put the liquids into the bread machine followed by the dry ingredients. Follow our recipe, but use 1 additional large egg, and an additional 1 ounce (3 tablespoons) gluten-free flour.
Step 2: Choose your bread machine’s gluten-free setting. Set the crust to medium.
Step 3: Let the machine do its thing.
Step 4: Once the bread is done baking, remove it from the pan and place it back in the machine to finish cooling (this will help keep the crust from getting overly soft and potentially leathery).
Step 5: Slice and enjoy!
And how about these two-ingredient pancakes!
- 1 large banana, mashed (should be around ⅓ to ½ cup when mashed)
- 2 eggs
If you’re mixing in a bowl, make sure the banana is all mashed. Then spray your pan with some PAM or coconut oil on low to medium heat, scoop some of the batter on there, give it about 20-30 sec, flip, and done!
Optional add-ins:
- ⅛ tsp baking powder to make them fluffier
- 2 tbsp nut butter, pb2/peanut flour, almond flour or dessicated coconut (see notes)
- ¼ tsp ground cinnamon
- ¼ cup blueberries/ raspberries/ chopped nuts
- 2 tbsp mini chocolate chips