THE COMBAT SIDE STROKE GUIDE: THE BEST NEW TOOL THAT DESCRIBES COMMON SWIM MISTAKES AND TIPS TO CORRECT THEM
-
By the U.S. Navy SEAL + SWCC Scout Team (Longer Video here: HERE)
The Combat Side Stroke (CSS) is a variation of the side stroke taught to all United States Navy SEALs. It was developed by the Naval Special Warfare Basic Training Command and the Naval Special Warfare Preparatory School. The CSS is a relaxing and super-efficient swim stroke that’s a mix of sidestroke, freestyle and breaststroke. The Combat Side Stroke allows the swimmer to swim more efficiently and reduces the body’s profile in the water in order to be less visible during combat operations when surface swimming is required.
“If you find yourself swimming through the surf zone to a beach with 60+ pounds of equipment,” says a trainer, “your comfort level in the water or your ability to swim should be the last thing on your mind. The only thing you’re focused on then is the execution of the mission.”
There’s no trick; no easy way to master the Combat Side Stroke. There’s no substitute for hard work and preparation. Hit the pool at least three days every week and spend a minimum of one hour each session. Your goal should be to swim using the sidestroke up to 500 yards in under ten minutes. That preparation will give you the confidence and comfort level you need to succeed. If you discipline yourself and practice these skills, you’ll find yourself swimming faster and more efficiently.
Stroke description
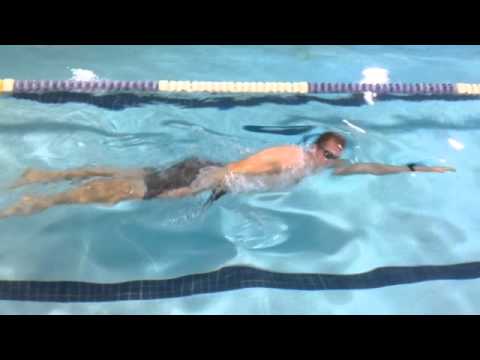
The CSS is a long axis tactical stroke designed to be low profile, efficient, and fast. It is used to travel long distances in open water and to quickly swim through the surf zone. The CSS is performed with or without fins, and in various configurations of tactical dress and protection. The CSS is performed with a 90 degree balanced rotation. This stroke begins on the stomach then onto the side and back to the stomach. All put together it is a natural rotation, using the core to assist and create power and torque.
The Combat Side Stroke utilizes the three main fundamentals of swimming:
- Balance: Two elements affect your balance in the water: the head and lungs. Many swimmers, especially when using the breaststroke, will swim with their head up, which forces their hips to sink down. This position is like swimming uphill. But when the body is flat and parallel to the water-line, swimming is far more effective and the swimmer is more comfortable.
- Length: The taller the person, the faster they swim! So when the swimmer is fully stretched horizontally in the water, their body’s drag is reduced and they can swim faster.
- Rotation: In baseball, when the batter swings the bat, he rotates his hips to increase the power of the swing. It works the same way in swimming. If the swimmer engages the hips and uses the body’s core muscles, it will increase power.
Body position
The swimmer is stabilized by alignment of the head, back, and hips which is referred to as stabilizing the core. Stabilizing the core is the foundation of the stroke. This is achieved by beginning the stroke in the streamline position and ending in the same position. With continued alignment, the energy output is directed to forward movement and sidewinding is minimized.
| BODY POSITION | |
|---|---|
| Mistake | Correction |
| 1. Swimming Up-hill | Maintaining a head down posture with head below the surface of the water, also known as “Swimming Down-hill” |
| 2. Head at surface causing the hips to slant downward, increasing drag | Leaning into the stroke, or ensuring top of head is pointing in the direction of travel |
The Catch and Pull – Initial arm
The top arm begins and ends in the streamline position. It is a cyclical pattern. At the top of the stroke (the longest body position), the swimmer presses the palm of the hand down to begin the catch, continuing until a vertical forearm is achieved and the elbow is above the wrist.
The swimmer then begins the pull sequence by following through until the hand is in line with the upper thigh and the arm is fully extended. The swimmer will be on their side until recovery of the pull arm has begun. Immediately, as the swimmer’s hand comes in line with the thigh, the recovery sequence begins.
| PULL PHASE | |
|---|---|
| Mistake | Correction |
| 1. High or raising the elbow in recovery (Sharkfin) | Following hand along the mid-line |
| 2. Half Pull – when swimmer begins the recovery prior to full range of motion | Make sure the arm is fully extended alongside the body |
| 3. Not achieving full extended streamline before starting next arm cycle | Have swimmer glide underwater for 2-3 seconds in streamline position |
| 4. Not rotating when pulling | Rotate the body and hips to create more power, similar to how a baseball player throws with more power by using his core/hips/shoulders |
| 5. Hand exiting the water | Don’t let it |
| SCULL ARM | |
|---|---|
| Mistake | Correction |
| 1. Dropping the elbow in the initial catch position | Keep the hand below the elbow |
| 2. Pulling the sculling arm too far back or under the body | Keep the hand in front of the arm pit |
Streamline
Streamline is the body position with the least resistance that a human can create in the water. During the streamline the swimmer has the option of doing a Flutter Kick to help keep momentum moving forward.

Initiating the Catch
Keep the fingers lower than the wrist, wrist lower than the elbow, and the elbow lower than the shoulder. This allows the swimmer to start anchoring the elbow to maximize the effectiveness of the pull arm.

Full Catch
Position the arm to allow the swimmer to pull them over an anchored position. This maximizes the surface area of the swimmers arm, while also allowing the swimmer to utilize larger muscle groups for propulsion.

Full Catch, anchored position

Full Catch, pull phase

Full Catch, finish the initial pull and take a breath with head close to touching arm
Recovery
The swimmer’s arm will be fully extended; hand past their waist, along the side of their body when the swimmer begins the recovery. The swimmer begins the recovery process by moving the hand forward (hand and arm must be underwater) as close to the body as possible, from past the hips back to streamline.
During this phase, the swimmer will rotate the shoulders and hips to move from their side into a streamline position and onto their stomach. The swimmer will end in the same streamline position. By rotating the body when pulling, the swimmer becomes more efficient and powerful. This creates more torque as opposed to pulling with the arm only.

Recovery, beginning of the power pull

Recovery, beginning of the power pull

Recovery

Sharkfin – Don’t use a high elbow recovery
Recovery, end recovery by entering streamline
Lead Arm
The lead arm works independently from the pull arm. It is a supplementary movement to complete the swimmer’s rotation to the initial starting position, the streamline. When the pull arm is recovering and has begun moving forward from the waistline to the streamline position, the lead arm slightly presses down and makes a catch. The fingertips of the lead arm will rotate down with the palm pressing back as the elbow remains higher than the hand. This leads into a small sculling motion (this motion is almost identical to a breast stroke motion). The two hands will meet at or in front of the mask as the swimmer reaches forward, placing the swimmer in the streamline position.

Lead Arm Catch

Reach Forward

Reach to Streamline
______
.SCISSOR KICK
The swimmer utilizes the Scissor Kick in the Combat Side Stroke when not using fins. It may also be used in treading evolutions without fins. The Scissor kick is a very powerful kick, but has a resting period when in the streamline position. To become more efficient, the swimmer can use a Flutter Kick until the next stroke cycle begins. The legs work independently of each other. The top leg (the leg closer to the surface of the water) and the bottom leg (the leg furthest from the surface) move forward and backward respectively, and then meet back together in a streamlined position. Hence, the name of the kick, the movement resembles a pair of scissors.
| SCISSOR KICK | |
|---|---|
| Mistake | Correction |
| 1. Top leg: pointing the foot, instead of keeping it flexed toward the shin. | Draw the toes toward the shin throughout the kick until the streamline position |
| 2. Bottom leg dropping causing a BreaststrokeKick | Make sure both legs are moving along the same plane (forward and back) |
The top leg
The swimmer draws the knee up so there is a 90 degree angle at the hip and knee. The swimmer then extends the lower portion of the leg (from the knee to foot) forward, keeping the foot flexed toward the shin. Once the top leg is fully extended, the swimmer points the toes and squeezes the leg to initiate movement back to the starting position.
The bottom leg
The swimmer bends the knee and kicks it backward with a flexed foot. The swimmer will then draw the foot back to the starting position meeting the top leg.
Application of the Scissor Kick
The Scissor kick is a powerful kick that also provides a moment of recovery in the glide phase of the stroke. The power of the Scissor Kick is derived from pushing the water behind the swimmer using the top of the bottom foot and the bottom of the top foot. At the end of each kick cycle, the swimmer will glide in a streamlined position, using the Flutter Kick until the next stroke cycle begins.

Scissor Kick, knee drawn

Kick the legs outward

Feet return to start position
______
.FLUTTER KICK
The Flutter Kick is used to propel a swimmer through the water. It is a continuous kick, resulting in a continuous forward motion. The kick is employed with or without fins. It is an integral part of CSS with fins, contributing to continuous speed and consistent power. The Flutter Kick is initiated from the hips, allowing the legs to move independently in an up and down motion. While the legs remain long and straight, this does not mean they are rigid. The swimmer must have a natural bend to the knee (a slight bend, nothing more) and relaxed ankle, though the toes must be pointed behind the swimmer. This provides as much surface area as possible to the kick, resulting in a greater displacement of water and forward motion. The swimmer will kick their legs in an up and down motion; pushing the top of the foot down, and pulling the other foot up. Without fins, the kick has a smaller range of motion and is much faster. The kick without the use of fins should occur around fifteen times every ten seconds. When fins are utilized, the rate of the kick will slow slightly, and the range of the kick will become slightly bigger. It is imperative that the swimmer does not disturb his natural body alignment with the gait of the kick.
| FLUTTER KICK | |
|---|---|
| Mistake | Correction |
| 1. Kicking with foot in a natural flat footed position | This limits the surface area for the kick, which in some cases leads the swimmer to sink. Have the swimmer point his toes as if punting a football. |
| 2. Too Large of a Kick | The swimmer should imagine kicking within a 1.5 foot by 1.5 foot box. |
| 3. Feet out of the water, excessive splashing | Only allow the bottom of the foot to meet the surface of the water. |
| 4. Bicycle Kick | This occurs when the kick is initiated from the knee. Reinforce that the kick begins with hip and there is only a slight natural bend to the knee. |
______
.STROKE ELEMENTS COMBINED
The swimmer’s starting and stopping point of the stroke cycle is in the streamlined position. The stroke begins with the pull arm. As the swimmer pulls, the swimmer will allow the shoulder and hips to open to the appropriate direction, allowing an opportunity to breath. When the pull arm begins the recovery, the kick (either Scissor or Flutter kick), will help facilitate the body’s rotation back into the streamline position. While in this streamline position just under the surface of the water, the swimmer is encouraged to exhale slowly, and Flutter Kick, especially with the use of fins. This will assist in a continuous and consistent forward motion.
Slick

Streamline position (also starting position)

Anchor of the pull arm

Pull Phase

End of the pull phase and begin to breathe

Initiation of the power pull, below waterline view

Initiation of the power pull, above waterline view

Finishing the recovery and starting the Scissor Kick

Finish the Scissor Kick and shoot arms into Streamline

Streamline (also the end position)
With a wetsuit and fins

Streamline

Initiating the Catch

Anchored Position

Pull Phase

Initiate Power Pull

Beginning of Recovery

End Recovery by entering Streamline

End recovery by entering Streamline

Streamline
______
.GUIDE STROKE
Objective
To ensure the correct and most efficient mechanics and techniques can be used for guiding in open water swimming.
Stroke description
The Guidestroke is used in conjunction with CSS during open water swimming to sight stationary objects to ensuring the swimmer swims in a straight line. The Guidestroke itself is very similar to a Breaststroke stroke in that the swimmer is lifting the head and upper body out of the water. While the head is out of the water the swimmer will then sight on a stationary object, whether it is a buoy in the water or a house on land, this will help the swimmer stay on course.
Body position
The swimmer is stabilized by alignment of the head, back, and hips which is referred to as stabilizing the core. Stabilizing the core is the foundation of the stroke. This is achieved by beginning the stroke in the streamline position and ending in the same position. With continued alignment, the energy output is directed to forward movement and sidewinding is minimized.

Streamline starting position
Breaststroke Pull
From a streamline position, palms press out slightly wider than the shoulders. Continuously press the palms against the water. Rotate the hands so that the palms pull in towards the chest, finger-tips pointing down while maintaining a high elbow position. Pulling the arms towards the chest creates forward momentum which allows the chest to be angled up, and the head in place to breathe and guide.
Breaststroke Pull, initial catch

Breaststroke Pull, initial breath and pull for the Breaststroke
Guiding
Guiding is used to sight stationary objects and ensure traveling in a straight line during open water swimming.

Guiding, breathing and guiding position, lateral view

Front view, begin breaching the surface

Front view, full breach
Dolphin Kick
The kick used with the Guidestroke is a Dolphin Kick. As the arms move forward, both feet are used simultaneously to kick in a downward motion and drive the body below the surface of the water into the initial starting or streamline position.

Dolphin Kick, initial kick phase

Power kick phase

Ending position into Streamline