It’s fruit season. Now’s a great time to discover the delights of home canning, wherever you live. For a great summer activity that will brighten up your winter as well as give you some emergency food storage skills, let Kimberley King walk you through peach canning.
One of my favorite signs of spring is the opening of local fruit stands. Most of the rickety old gray structures have gone unnoticed during the winter. So, when the stands are reopened they seem to pop up from out of nowhere. I find them irresistible and will go out of my way to visit a fruit stand.
How often have you found yourself surrounded by bushels of tree ripened peaches or pints of freshly harvested berries only to limit your purchase to what you could eat in a day or two? You’ve lamented that you would buy more if only the fruit would stay fresh longer. That describes me until a couple of years ago when I tried canning.
I’m young enough that I have never needed to can a garden’s harvest to survive the winter, yet old enough to have watched my Grandmother stock her cellar. Today we don’t need to can. We can buy anything we desire any hour of the day, any day of the week. However, believe me when I say that fresh fruit picked and processed at its peak ripeness tastes phenomenal.
Here’s what you’ll need to do to get prepared for processing your first big fruit purchase. The method I’m about to describe for canning peaches works for most high acid foods (like fruits), but not for beans or vegetables. I highly recommend that you obtain your supplies before you purchase the fruit because you’ll want to process it within a few days.
Equipment the professionals recommend
Purchase a canning kit that contains the following items. You should be able to get it for less than $50.
- A large boiling-water canner with a lifting rack in which to boil the jars.
- A funnel for pouring the fruit into the jar.
- A jar lifter for removing the jar from the boiling water.
- A flexible spatula especially designed to eliminate bubbles in the full jars.
- A magnetic lid wand that aids in the removal of lids from the boiling water.
- Canning jars with two-piece vacuum lids.
- A copy of the Ball Blue Book – Guide to Home Canning, Freezing & Dehydrations that you will want to read front to back.
More supplies I recommend
These are the items you have around the house and will want within arm’s reach.
- A friend to help wash, peel, cut, and cook the fruit.
- A couple of peelers and paring knives, as well as cutting boards.
- Plenty of dish towels.
- A few large bowls.
- Fruit Fresh – Fruit Fresh can be found in any grocery store, usually near the flour and sugar. You’ll likely find it near the canning jars. It’s used to prevent discoloration.
Processing
Okay, you have your equipment, you have your friend, you have your fruit, you have read the Blue Book, and you have selected your recipe. Here’s a little piece of advice: Start with something simple like sliced fruit or jam. I started with salsa and forgot to invite a friend to help. It’s a wonder I ever canned again.
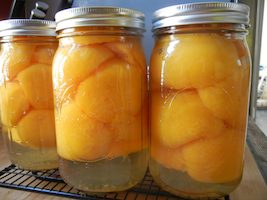
You can can just about any food using the Blue Book recipes. One of my favorites is peaches. The simplest way to can peaches is to place halves in a quart jar surrounded by light syrup. One thing before you get started: select peaches that don’t have bruises. If you can fruit with bruises, you will eat bruised fruit.
Prepare the jars
- Since you are canning peach halves you will need to use quart sized jars. You will be able to fit between 2 and 3 pounds of peaches into each quart jar. Buy plenty of jars so you don’t run out during processing. Also, I recommend you get wide mouth jars, as it is easier to pack the peaches into them.
- Put your empty jars and lids into a water bath canner full of boiling water. You’ll need to leave them in there for about 10 minutes for sterilization.
- Place the jars out of the way on some towels.
- Keep the water in the water bath canner boiling or near boiling. You’ll use it again soon.
Peel those peaches
- Heat to boiling a large pot of water. Rinse off your peaches. Fill a bowl with very cold water.
- Place the peaches, just a few at a time, in the boiling water for 45 seconds. Lift each peach with a skimmer or ladle with holes. Don’t remove the peach with tongs. You’ll end up damaging the fruit. That’s experience talking.
- Immediately dip the peach in the cold water. As you dip more peaches you may need to add ice cubes to maintain cold water.
- The peel will slip off.
- Cut each peach in half and remove the pit and red fibers.
- Once cut peaches darken quickly, so you’ll want to use some Fruit Fresh on them immediately after pitting.
Make the syrup
- Make the syrup by mixing 1 1/4cups of sugar and 5 1/2 cups of water in a large saucepan. Heat the mixture until the sugar dissolves. Keep the mixture hot. For this method of canning peaches you must use sugar. This combination of sugar and water will make an extra light syrup.
- As you process the peaches you will probably need to make more batches of syrup, so don’t put the sugar away.
Packing the jars
- Drain the peaches.
- Pack as many peaches as possible into the jar, pit side down. Pack them as closely as possible without mashing them.
- Pour the hot syrup into the jar until you have only 1/2-inch between the syrup and the top of the jar. That’s called headspace. You must leave the headspace or the syrup may ooze out during processing and you will not get a seal.
- Run your plastic spatula between the inside edge of the jar and the peaches to eliminate air bubbles.
- Place the two-piece lid on the jar. Loosely hand-tighten the band.
Processing the peaches
- Use the jar lifter to place the jars into the boiling water in the water bath canner. Make certain the jars are covered by a couple of inches of water.
- Cover and boil for 30 minutes.
- Remove the processed jars and place them on a towel. As they cool the excess air is vented and the lids will seal. After the jars have cooled completely (be patient it could take several hours to cool) test the seal by pushing on the middle of the lid. If the center of the lid does not pop up, you’ve got a good seal. If it does pop up you don’t have a good seal. Those are the ones I eat immediately.
- Remove the outer bands then clean and dry the jars completely. Replace the bands and label your jars with their contents and the date.
Details like jar size and syrup recipes will be different for different kinds of fruits, but the processing method won’t change. I admit the canning sounds complicated. It can be time consuming, especially if you are processing a large quantity of fruit. So, buy a quantity of fruit based on the amount of time you have to peel, chop and boil. I can guarantee when you are enjoying the fruits of your labor, you won’t think twice about the time you spent canning.
 The Squirrel says: We got our beginner’s canning kit at Lehman’s and it’s great. Order your own at their website, www.Lehmans.com, or by calling their toll free phone number, 1-877-438-5346. Lehmans have been serving the Amish and others without electricity with products for simple, self-sufficient living since 1955.